Please ensure your ZOLEO device is activated. Click here for more information: How to Activate my ZOLEO Device. You must add the Location Share+ add-on to your ZOLEO account in order to use your ZOLEO device with your GetHomeSafe account.
Section 1: Configuring Zoleo
1. Check device Activation & Location Share+
Login to Zoleo. Your Zoleo device needs to be activated to integrate with GetHomeSafe. If your device is new and has not been used before you will need to activate your device: https://www.myzoleo.com/activate
Location Share+ needs to be included for each device.

2. Initiate data sharing
- Go to “My Data Sharing” in your Zoleo account
- Select GetHomeSafe as your partner
- Accept the data sharing agreement when prompted
- Confirm that data forwarding to GetHomeSafe is enabled for each device
.png?width=234&height=512&name=image%20(14).png)
.png?width=409&height=227&name=image%20(15).png)
Section 2: Configuring GetHomeSafe
The Zoleo integration should be enabled by default in GetHomeSafe.
If it is not enabled in your account, please contact support@gethomesafe.com
Step 1: Obtain your device specific Zoleo email address
- Login to Zoleo
- Select Devices & Plans
- Click your Zoleo device > Account information > Device information.
- Under "Email" is the Zoleo specific email address. You will need this email address for step 2.

Step 2: Add your Zoleo device to GetHomeSafe
You need Account Admin access to add devices, which is done in the Configure > GPS Devices

- Add the device provider, model, name, IMEI number, organisation
- Under “message channel” enter the Zoleo email from Step 1
- Click “Save”

Step 3: Turn on your device
Turn on your device, connect your smartphone to the device via the Zoleo app and bluetooth, ensure location sharing is enabled.
Step 4: Add registered contact
Add reply@gethomesafe.com +1 619 727 6935 as a registered contact in Zoleo mobile app

Location Share+ Recommendations
By default when out of coverage with your Zoleo your location will update to GetHomeSafe in the frequency set in your Zoleo app under:
- Settings
- Check-in, Location & SOS Settings
- Location Share+
- Location Update Interval
By default your location will update every hour. This can be changed to the following:
- 6 Minutes - High battery usage
- 12 minutes
- 30 minutes
- 1 hour - Default
- 2 hours
- 4 hours - Low battery usage
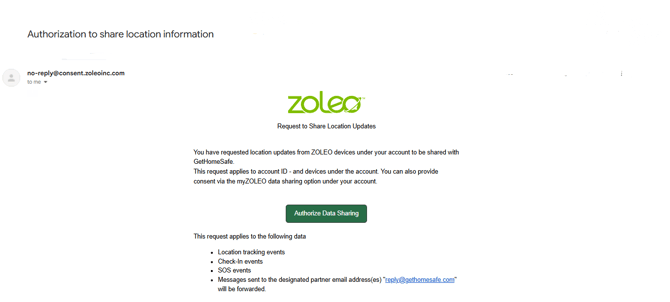
Step 5: Accept data authorization
After saving the Zoleo in GetHomeSafe, an email “Authorization to share location information” will be sent to the email address of the Zoleo account contact for the specific Zoleo device
Click “Authorize Data Sharing”
Step 6: Test your device works
In GetHomeSafe go to GPS Devices and find your Zoleo.
Send a test message to your Zoleo and check it comes through OK. The status will show a green tick and ready like in the screenshot below. If this is not showing for you can press the tick button on your Zoleo device and press “Check status”

Step 7: Assign the device to users (Optional)
Your device will show on the GHS dashboard. Leave blank if your device is a pool device, or assign to an individual user (this can be changed at any time.)
Note: To perform GHS #start commands, the device must be already assigned to the user


You're ready to go
Your device will show on the GHS dashboard and is ready to assign to a user. Your Zoleo device will now appear in the pre-start screen when starting a Get Home Safe activity, or is available to select if set as a pool device.
